Example examples/tiled
Tiled maps
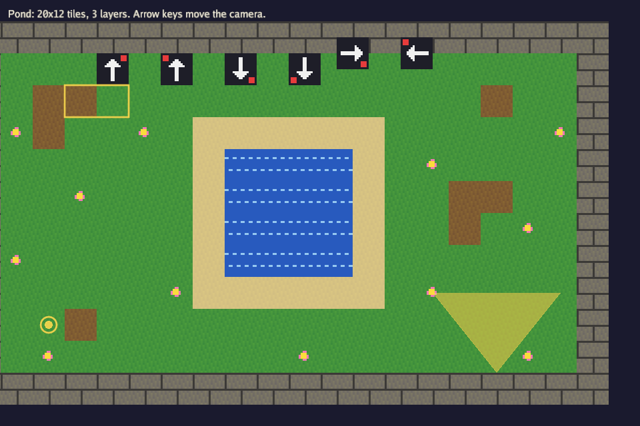
This example loads a map made in the Tiled
editor and draws it. The map is embedded in the binary as a .tmj, its
tileset image is painted at start-up rather than shipped as a file, and
the result is drawn under a Camera2D that the arrow keys move. Tiles
that the map marks as flipped or rotated show it, an animated water tile
runs its two frames, and every object in the map's object layer is
outlined so its placement can be checked.
The work is done by tiled: Parse and Load read
a map, Build turns it into a tiled.Level of tilemaps that
gfx can draw, Level.Advance runs tile animations
and Level.Draw draws every layer in order. The map's own background
colour, properties, layer offsets and object shapes all come through.
The related guide is 2D graphics; the
tiles example covers the tilemaps this one builds on.
Run it with:
go run ./examples/tiled -seconds 3 -shot out.png
-map file.tmx or -map file.tmj loads a map from disk instead of the
embedded one, reading its tileset images from the map's own directory.
The arrow keys move the camera; Escape quits. When -seconds is given
the camera drifts on its own so an unattended screenshot shows the map
in motion.
The embedded map, the constants and the game type
//go:embed level.tmj compiles the map into the binary, so the default
run needs nothing on disk. The frame constants name positions in the
tileset the map refers to, in the same order makeTiles paints them,
which is the contract between the generated image and the .tmj.
tiled.Level is the built map: the parsed Map, the layers, and the
GPU resources behind them.
//go:embed level.tmj
var levelJSON []byte

const tile = 16

// Tileset frames, matching level.tmj's tileset.
const (
	frameGrass = iota
	frameDirt
	frameWall
	frameArrow
	frameWaterA
	frameWaterB
	frameFlower
	frameSand
)

type game struct {
	seconds  float64
	shot     string
	shotDone bool
	mapFile  string

	font  *gfx.Font
	level *tiled.Level
	cam   gfx.Camera2D
}
Init: parsing and building the map
Reading a map is two steps. tiled.Parse (for bytes) or tiled.Load
(for a path) produces a tiled.Map, which is the file's contents and
nothing more: no GPU resources, so it can be inspected or transformed
first. tiled.Build then turns that into a tiled.Level, calling the
tiled.Images function it is given for each tileset image the map
names.
That callback is what decouples the map from where its art comes from.
The embedded map names tiles.png, but the function here ignores the
name and returns the generated image, so nothing has to ship beside the
binary. When -map is given, fileImages reads the file relative to
the map's directory instead, which is what the editor expects.
m.BackgroundColor is the colour set in the editor's map properties; it
is copied into ctx.Clear, the colour the frame starts from.
Level.Size() is the map's size in view units, so half of it centres
the camera.
func (g *game) Init(ctx *engine.Context) error {
	var err error
	if g.font, err = ctx.Gfx.NewFont(goregular.TTF, 15, gfx.FontOptions{}); err != nil {
		return err
	}
	var m *tiled.Map
	// The embedded map names tiles.png; the image comes from makeTiles
	// instead. A map from disk reads its images from its own directory.
	images := func(string) (image.Image, error) { return makeTiles(), nil }
	if g.mapFile != "" {
		m, err = tiled.Load(g.mapFile)
		images = fileImages(filepath.Dir(g.mapFile))
	} else {
		m, err = tiled.Parse(levelJSON, nil)
	}
	if err != nil {
		return err
	}
	g.level, err = tiled.Build(ctx.Gfx, m, images)
	if err != nil {
		return err
	}
	bg := m.BackgroundColor
	ctx.Clear = gfx.RGBA(bg.R, bg.G, bg.B, bg.A)
	g.cam = gfx.Camera2D{Position: g.level.Size().Mul(0.5), Zoom: 3}
	return nil
}

func (g *game) Shutdown(ctx *engine.Context) {
	g.level.Destroy()
	g.font.Destroy()
}
Level.Destroy releases the textures Build created, so the game does
not track them itself.
Update: moving the camera and advancing animations
The arrow keys accumulate a direction and the camera moves by 120 units
per second divided by the zoom, so panning feels the same at every zoom
level. Level.Advance(dt) steps the tile animations the map defines,
which is the only per-frame work a static map needs.
func (g *game) Update(ctx *engine.Context) error {
	in := ctx.Input
	if in.KeyPressed(input.KeyEscape) || (g.seconds > 0 && ctx.Time >= g.seconds) {
		ctx.Quit()
	}
	if g.shot != "" && !g.shotDone && (g.seconds == 0 || ctx.Time >= g.seconds/2) {
		ctx.Screenshot(g.shot)
		g.shotDone = true
	}
	var move lin.Vec2
	if in.KeyDown(input.KeyLeft) {
		move.X--
	}
	if in.KeyDown(input.KeyRight) {
		move.X++
	}
	if in.KeyDown(input.KeyUp) {
		move.Y--
	}
	if in.KeyDown(input.KeyDown) {
		move.Y++
	}
	if g.seconds > 0 && move == (lin.Vec2{}) {
		move = lin.V2(float32(math.Sin(ctx.Time*0.8)), 0) // drift a little for screenshots
	}
	g.cam.Position = g.cam.Position.Add(move.Mul(float32(ctx.Delta) * 120 / g.cam.Zoom))
	g.level.Advance(ctx.Delta)
	return nil
}
Draw: the level, its objects and a caption
Level.Draw draws every visible tile layer at the given offset, tinted
by the colour, in the order the editor put them in. The object layers
are not drawn by it: what to do with their shapes, properties or tile
references is the game's decision.
This example walks the layers, skips anything that is not a visible
object layer, and outlines each object.
The caption reads Properties.String("title") from the map, which is a
custom property set in the editor, and the map's size in tiles. Anything
the editor can attach to a map, layer, tile or object arrives as
properties.
func (g *game) Draw(ctx *engine.Context) error {
	gr := ctx.Gfx
	gr.SetCamera2D(g.cam)
	g.level.Draw(gr, 0, 0, gfx.White)
	for _, l := range g.level.Layers {
		if l.Kind != tiled.ObjectLayer || !l.Visible {
			continue
		}
		for _, o := range l.Objects {
			drawObject(gr, o, l.Offset)
		}
	}
	gr.ScreenSpace()
	text := fmt.Sprintf("%s: %dx%d tiles, %d layers. Arrow keys move the camera.",
		g.level.Map.Properties.String("title"), g.level.Map.Width, g.level.Map.Height, len(g.level.Layers))
	gr.DrawText(g.font, text, 12, 12, gfx.RGB(240, 235, 220))
	return nil
}
Loading images from disk
tiled.Images is a function type taking the path the map recorded and
returning an image. fileImages returns one bound to a directory. The
path in the map file uses forward slashes whatever the platform, so
filepath.FromSlash converts it before joining. The blank import of
image/png at the top of the file registers the PNG decoder that
image.Decode needs.
// fileImages reads tileset images from disk, relative to the map's
// directory.
func fileImages(dir string) tiled.Images {
	return func(p string) (image.Image, error) {
		f, err := os.Open(filepath.Join(dir, filepath.FromSlash(p)))
		if err != nil {
			return nil, err
		}
		defer f.Close()
		img, _, err := image.Decode(f)
		return img, err
	}
}
Outlining objects
An object from Tiled is a point, a polygon, an ellipse or a rectangle,
which the switch distinguishes by which fields are set: Point and
Ellipse are flags, and a polygon has points. Coordinates are relative
to the layer, so the layer's Offset is added; polygon points are
relative to the object's own position, so both are added. The stroke
widths are 0.5 because these are drawn in world space under a zoom of 3,
where a width of 1 would be a fat line.
// drawObject outlines a map object so its placement can be checked.
func drawObject(gr *gfx.Graphics, o tiled.Object, off lin.Vec2) {
	c := gfx.RGBA(255, 220, 80, 200)
	x, y := o.X+off.X, o.Y+off.Y
	switch {
	case o.Point:
		gr.FillCircle(x, y, 2, c)
		gr.StrokeCircle(x, y, 4, 0.5, c)
	case len(o.Polygon) > 0:
		pts := make([]lin.Vec2, len(o.Polygon))
		for i, p := range o.Polygon {
			pts[i] = p.Add(lin.V2(x, y))
		}
		gr.FillPolygon(pts, c.WithAlpha(0.35))
	case o.Ellipse:
		gr.StrokeCircle(x+o.Width/2, y+o.Height/2, o.Width/2, 0.5, c)
	default:
		gr.StrokeRect(x, y, o.Width, o.Height, 0.5, c)
	}
}
Painting the tileset
makeTiles builds the eight tiles the embedded map expects, as two rows
of four, which is the layout the .tmj describes. The set helper
turns a frame index into a position in that grid, so the painting code
works in frame-local coordinates.
The arrow tile exists to make flips visible. It points up and carries a red mark in one corner, so each of the eight flip and rotation combinations Tiled can store looks different on screen. The two water frames differ only in where their ripple sits, which is enough to see the animation run.
// makeTiles paints the eight 16x16 tiles level.tmj's tileset expects, in
// two rows of four.
func makeTiles() image.Image {
	img := image.NewNRGBA(image.Rect(0, 0, 4*tile, 2*tile))
	set := func(frame, x, y int, c color.NRGBA) {
		img.SetNRGBA((frame%4)*tile+x, (frame/4)*tile+y, c)
	}
	for y := range tile {
		for x := range tile {
			v := uint8((x*7 + y*13) % 16)
			set(frameGrass, x, y, color.NRGBA{60 + v, 140 + v, 60, 255})
			set(frameDirt, x, y, color.NRGBA{120 + v, 85 + v, 50, 255})
			set(frameSand, x, y, color.NRGBA{210 + v/2, 190 + v/2, 130, 255})
			set(frameFlower, x, y, color.NRGBA{60 + v, 140 + v, 60, 255})
			wall := color.NRGBA{110 + v, 105 + v, 100, 255}
			if y%8 == 0 || (x+(y/8)*8)%16 == 0 {
				wall = color.NRGBA{60, 58, 55, 255}
			}
			set(frameWall, x, y, wall)
			// Two water frames whose ripple sits at different heights.
			for f, ripple := range []int{4, 10} {
				c := color.NRGBA{40, 90, 190, 255}
				if y == ripple && x%4 < 2 || y == ripple+6 && x%4 >= 2 {
					c = color.NRGBA{150, 200, 240, 255}
				}
				set(frameWaterA+f, x, y, c)
			}
			set(frameArrow, x, y, color.NRGBA{30, 30, 40, 255})
		}
	}
	// An arrow pointing up with a red dot in its top-right corner so every
	// flip and rotation looks different.
	white := color.NRGBA{240, 240, 240, 255}
	for y := 3; y < 14; y++ {
		set(frameArrow, 7, y, white)
		set(frameArrow, 8, y, white)
	}
	for i := range 4 {
		for x := 7 - i; x <= 8+i; x++ {
			set(frameArrow, x, 3+i, white)
		}
	}
	for y := 1; y < 4; y++ {
		for x := 12; x < 15; x++ {
			set(frameArrow, x, y, color.NRGBA{230, 60, 60, 255})
		}
	}
	// A flower: petals around a yellow centre.
	pink := color.NRGBA{240, 120, 180, 255}
	for _, p := range [][2]int{{7, 5}, {5, 7}, {9, 7}, {7, 9}, {8, 5}, {5, 8}, {9, 8}, {8, 9}} {
		set(frameFlower, p[0], p[1], pink)
	}
	for y := 6; y < 9; y++ {
		for x := 6; x < 9; x++ {
			set(frameFlower, x, y, color.NRGBA{250, 220, 60, 255})
		}
	}
	return img
}
main
func main() {
	seconds := flag.Float64("seconds", 0, "exit after this many seconds")
	shot := flag.String("shot", "", "write a screenshot to this PNG")
	mapFile := flag.String("map", "", "load this .tmx or .tmj map instead of the embedded one")
	flag.Parse()
	err := engine.Run(engine.Config{Title: "Bunyip tiled", Width: 960, Height: 640, Resizable: true},
		&game{seconds: *seconds, shot: *shot, mapFile: *mapFile})
	if err != nil {
		fmt.Fprintln(os.Stderr, "tiled:", err)
		os.Exit(1)
	}
}
What to try
- Open
level.tmjin the Tiled editor, add a layer, and run the example again; nothing inInitneeds changing. - Use the objects for something in
Drawrather than outlining them: read atypeproperty indrawObjectand spawn from it. - Give the map a second animated tile in the editor and confirm
Level.AdvanceinUpdateruns it. - Replace
makeTileswith a real tileset image, save it beside a.tmxand load that with-map. - Draw only some layers by walking
g.level.LayersinDrawyourself instead of callingLevel.Draw, which is what a game with entities between two layers has to do.